Step 1: Design
You can go about this in whatever way feels comfortable. Here are some tips.
1. Find an image of your monster that you really like on the internet and use that for inspiration. Make sure that the FACE is very clearly mapped out for you. Cartoons and drawings work really, really well. You should have some already found from your research!
2. Draw your own Monster! If you have a talent for it use it! Be sure to focus on the face.
3. Just start cutting. Sometimes using the materials is really helpful. If you want- head right to step two.
Step 2: The Outline
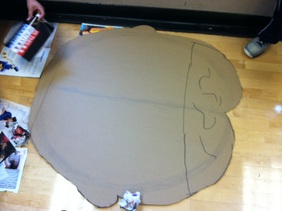
The first thing you want to do is select a piece of cardboard. It should be between 1-2 feet long (the ones in the pictures are TOO BIG, so downsize!)
Then, sketch out the general shape of the face. You DO NOT have to draw facial features. This is the base of your mask and all it has to do is act like the outline of a cartoon. Just focus on the shape of the head, ears, chin and hairline.
When you finish drawing, grab an x-acto knife and CAREFULLY start cutting. Never cut directly on the floor, always put something under your cardboard. Also, never draw the x-acto knife directly towards you.
Step 3: Building volume with newspaper
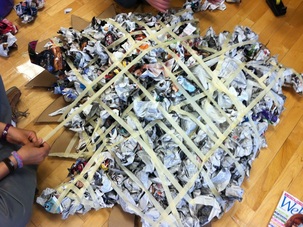
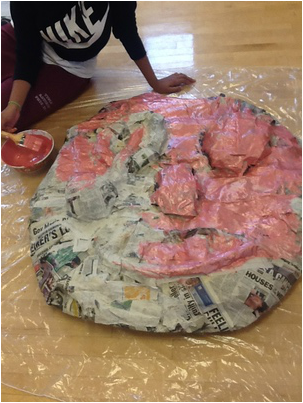
Your mask will eventually need to be 3D. To do this you have to building up height on the base of your mask. To do this just start crumpling newspaper or magazines and laying them down on your mask.
When you finish crumpling up newspaper use tape to gently secure the paper on the mask. You don't need to tape each piece, just lay strips of tape over the top.
When you finish crumpling up newspaper use tape to gently secure the paper on the mask. You don't need to tape each piece, just lay strips of tape over the top.
Step 4: papier-mâché
RECIPE 1:
1 part Elmers Glue
1 part Water
RECIPE 2:
1 part Flour
1 part Water
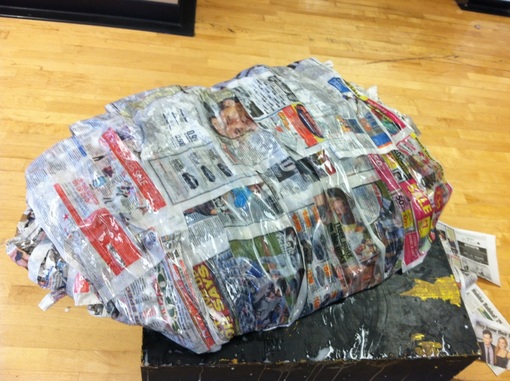
When you finish the crumpling and the taping, go ahead and mix up some papier-mâché in a bowl or bucket. This will be messy- use a smock!
As you can see from the photo this next step is to use strips of newspaper to smooth over the top of the crumpled paper. Think of it like a mummy. Here is a video of Arwa using strips of paper to smooth over some of her masks features, which is a step further down the line. However, it gives you an idea of how to use Papier Mache!
TIPS:
1. Make sure you use strips of paper, not chunks. You want a pretty smooth surface.
2. Don't be afraid of it being too wet- it will dry!
3. Watch out for the floor!
4. Make sure you wrap the paper around to the back of the mask so that no crumpled newspaper is showing!
1 part Elmers Glue
1 part Water
RECIPE 2:
1 part Flour
1 part Water
When you finish the crumpling and the taping, go ahead and mix up some papier-mâché in a bowl or bucket. This will be messy- use a smock!
As you can see from the photo this next step is to use strips of newspaper to smooth over the top of the crumpled paper. Think of it like a mummy. Here is a video of Arwa using strips of paper to smooth over some of her masks features, which is a step further down the line. However, it gives you an idea of how to use Papier Mache!
TIPS:
1. Make sure you use strips of paper, not chunks. You want a pretty smooth surface.
2. Don't be afraid of it being too wet- it will dry!
3. Watch out for the floor!
4. Make sure you wrap the paper around to the back of the mask so that no crumpled newspaper is showing!
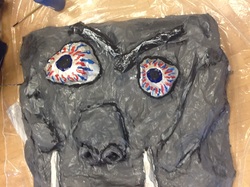
Step 5: Building up Features
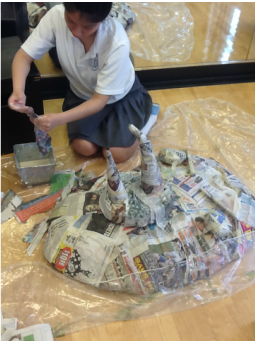
This step is where your artistry really plays a big role. Even though the materials are simple, you will be amazed how far newspaper and papier-mâché will take you. Don't be afraid to get the paper wet so it works more like clay. Also, don't be afraid to try something out. If you hate it you can easily rip it off.
As you can see, Lesley created a beak and eyes by crumpling up paper, taping it into the shape she wanted and then using strips of paper to papier-mâché over it all.
Refer back to this video AND video if you need want another look at how to do this!
This process will take you a few class periods to complete.
Step 6: Base paint
When you are satisfied with your features, the next step is to give your mask a coat of paint. Choose a color to pain the WHOLE MASK. You will add highlights and features later.
If you want some tips on how to make the color you want- check out his video.
Make sure you use a drop cloth and protect your clothes. This is messy work!
If you want some tips on how to make the color you want- check out his video.
Make sure you use a drop cloth and protect your clothes. This is messy work!
Step 7: Highlight Painting
Watch these videos to get an idea of how to go about painting your masks!
Highlight Painting Part 1
Highlight Painting Part 2
Highlight Progress
Highlight Painting Part 1
Highlight Painting Part 2
Highlight Progress
Step 8: Final Details
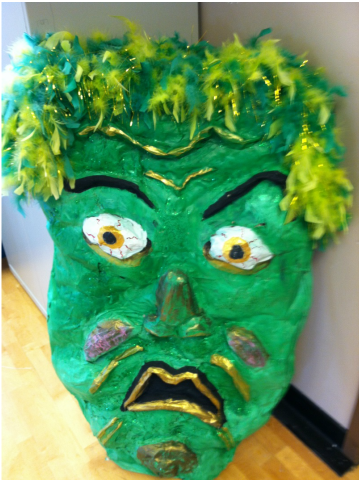
When you are finished painting, you will want to finish your mask with some other materials. Feathers, pipe cleaners, hair etc.
Let me know what you need!
Let me know what you need!
